Table of Contents
- Sample photo for this ultimate free workflow guide
- Not photo editing but important: adjusting camera specifics
- Setting highlights, shadows, whites and blacks using Adobe Camera photo editing software
- The next step: white balance, sharpening and noise reduction
- Final basic photo editing steps
- The steps I did to finetune this photo
Always wanted to know how I edit my photo’s? I know some of you do as I get a bunch of emails asking about it on a weekly basis. So, I decided to share with you my basic workflow I use for almost every photo. For free! Of course, there is some fine tuning after the basic process but this workflow will do 90% of the work. I’ll share some more tricks later on fine tuning. The software I use is Adobe Bridge and Adobe Camera Raw for photo editing. It’s also possible to do it in Adobe Lightroom as it gives the same options but Adobe Lightroom and I cannot go through one door together for some reason. This workflow works best for landscapes, architecture (inside/outside) and similar photos but not that well for portraits, close-ups and night photography. For such photos the workflow is similar but with some tweaks; I’ll share that later with you. Do you have suggestions for this ultimate free workflow guide then please leave a comment as I’m interested to know how your workflow looks like?
Sample photo for this ultimate free workflow guide
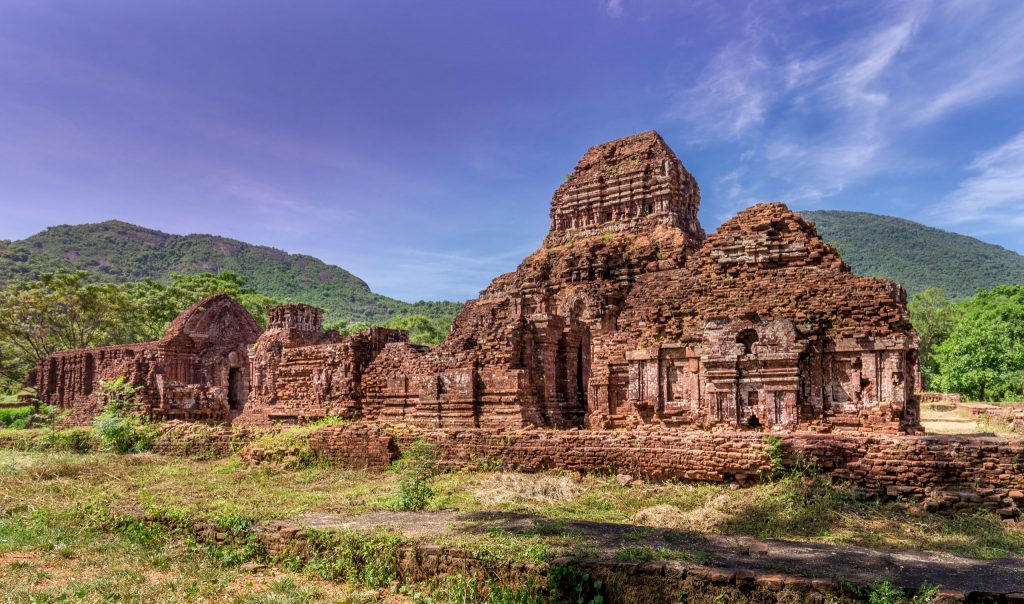
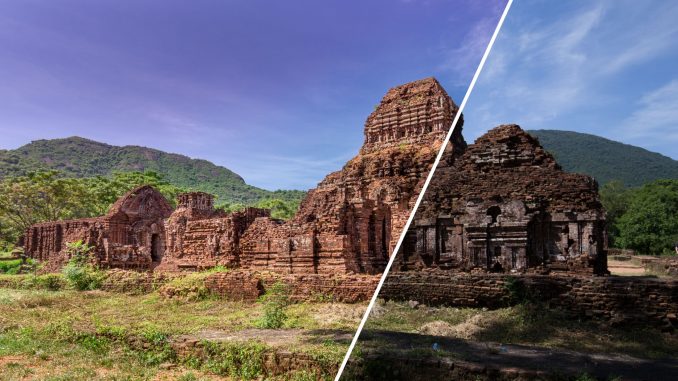
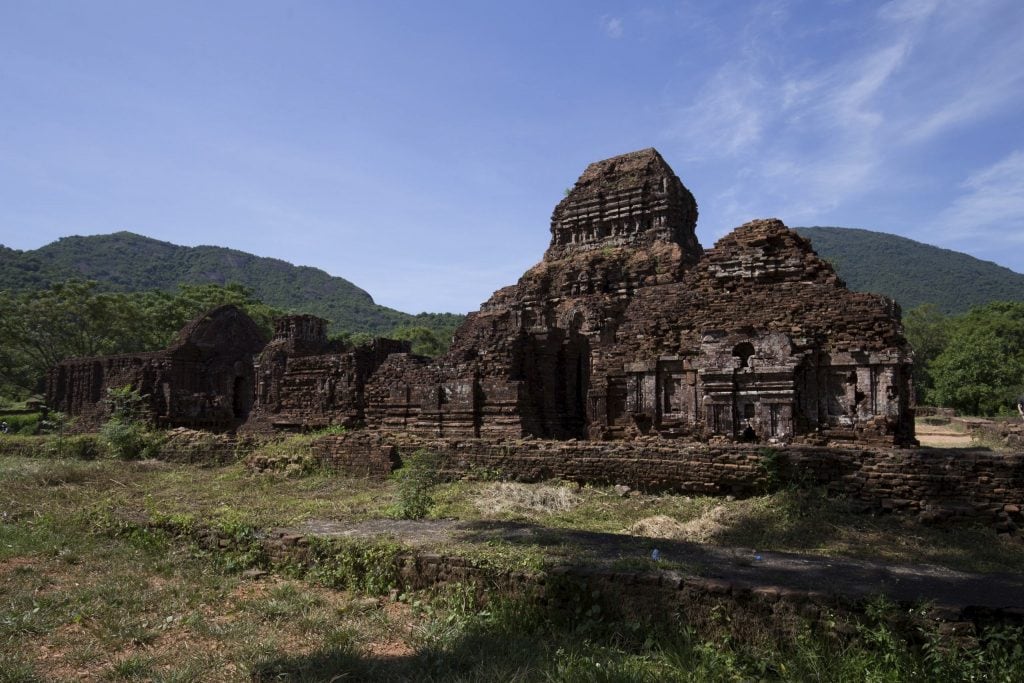
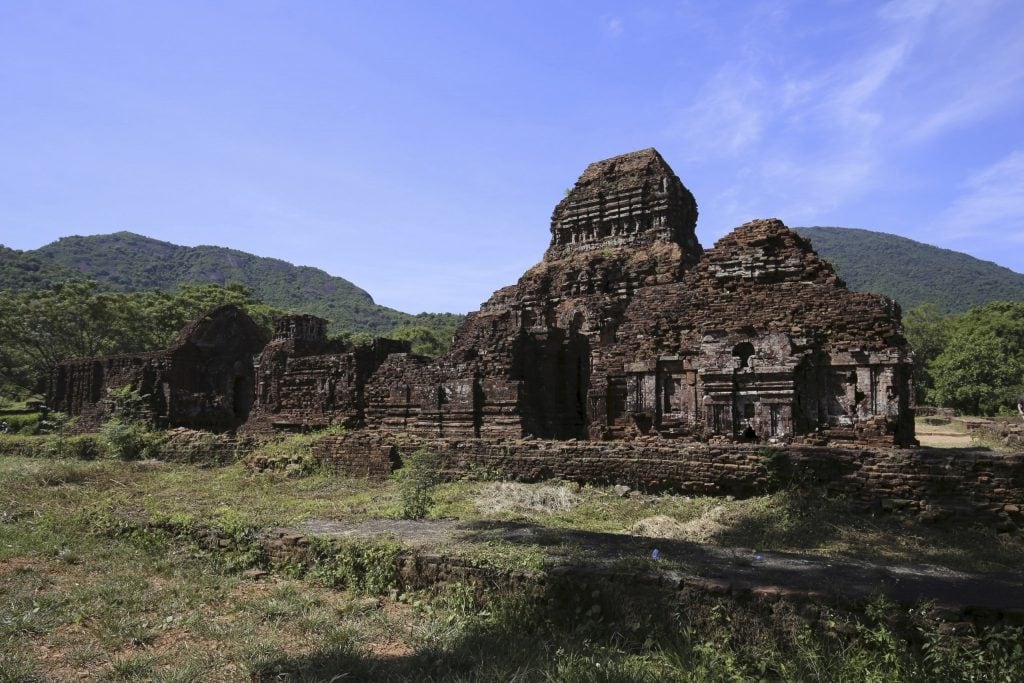
I didn’t spend too much time editing my photos in 2014 and 2015 but early 2016 I decided I MUST spend more time doing this (note that during 2009-2014 I didn’t edit at all and used JPG files straight of the camera; how bad). In this ultimate free workflow guide for basic photo editing I will use the photo you see below. To be able to use all the features of Adobe Camera Raw you do require a RAW file from your camera as otherwise it won’t work. I use a Canon 6D with several lenses as my camera gear. The following three images are 1) the RAW image unprocessed 2) the JPG image my Canon 6D processed automatically and 3) the final result after this basic workflow. This photo was taken in the summer of 2016 at the My Son Sanctuary in Vietnam.

Not photo editing but important: adjusting camera specifics
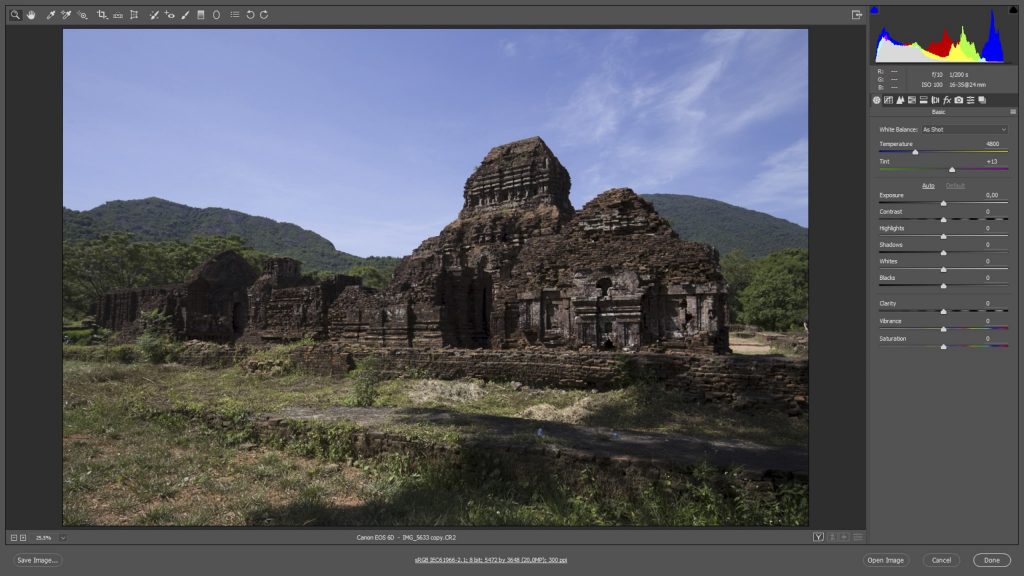
Let’s start! As I said I don’t use Adobe Lightroom, it simply doesn’t make sense to me, so I use Adobe Bridge to browse my folders. Just right-click the photo you want to edit and open it with Adobe Camera Raw. If you do use Adobe Lightroom you will find the same options so you can use this tutorial too. After opening we’ll get the following screen with some basic information like the shutterspeed of 1/200s at F/10 with an ISO 100 with my 16-35 lens @ 24mm. I highly recommend to ALWAYS shoot at ISO 100 if possible to avoid noise in the photos. As you can see in the undeveloped photo the shadows are dark but I do have good color in the sky. I did this on purpose as I know that I can fix the shadows without getting noise in the process.
The very first thing I do is opening the Lens Corrections tab and go to lens profiles (see screenshot below). Adobe Camera Raw knows my lens and automatically loads the lens profile. I select Remove Chromatic Aberration to get rid of possible purple and green lines at places where there is a big contrast difference. Enable Profile Correction is also an option I always select to remove possible vignetting and distortion. I just leave the remainder of the options standard as they are more for fine tuning at a later stage, if at all needed.

Setting highlights, shadows, whites and blacks using Adobe Camera photo editing software
Now let’s open the Basic tab and move the highlights and shadows sliders. The highlights slider goes all the way to -100% and the shadows go all the way to +100% (see next screenshot). This will give you back details in those areas but it will remove most of the contrast. Don’t worry we’ll get that back shortly.

Now we are going to get our blacks and whites back. Press the ALT key while sliding the white slider to the right (or left) and make sure that you will only see a handful of dots. Basically, the screen will be black meaning there is no pixel left without any information. Now move the black slider to the left while holding the ALT key up to the point you see some shadows appear. The left image of the next screenshot is the whites; if you look good you probably see one or two pixels. On the right are the blacks with much more pixels which is fine and needed. This process goes very quick after time but the first photos you edit you might struggle a bit. Don’t worry as after time this is just a matter of seconds and goes naturally. We now have both details in the highlights and shadows but also the contrast back. You will see that I don’t touch the contrast slider at all in this tutorial. I rarely use it.

The next step: white balance, sharpening and noise reduction
In the basic tab, I now set the white balance to either daylight, cloudy or shadow. This totally depends on the photo. I normally try all 3 and choose the one that looks best. I normally don’t look at the sky but the rest of the photo as the sky is the most easy to separately correct later. In this particularly photo I set the white balance to daylight. Fine tuning comes later!

The next step is (for me) very important when I’m editing photos: details. The following values are not standard and the same for each photo but for a daylight photo as the one I’m using here as a sample I know the numbers for my camera. It will depend a bit from camera to camera how much noise there is in the shadows. That’s why I always shoot at ISO 100 if possible to avoid noise. First, I put the noise reduction slider at 10 which I know is the value I need for photo’s as these. Then I put the sharpening at 100 – 10 = 90 (see left photo in the next screenshot). The formulae should be 100 – NOISE REDUCTION = SHARPENING. All other sliders I leave at standard settings except the masking slider. The masking slider masks (black areas) areas that don’t have much details. You don’t want to sharpen these as you would get noise back at these places. To set the slider press the ALT key and slide it to the right until for example the sky is mostly black. Other smooth surfaces should be also black. In this case I needed 24 for masking; this is just a number and varies per photo. Now the details are finished.

Final basic photo editing steps
The photo was for my personal preference still a bit too dark so I put the exposure in the basic tab to + 0.35 to make it a bit lighter (right screenshot below). This however made the blue in the sky to light. To adjust the blue in the sky I took the Targeted Adjustment Tool at the top of the window and opened the HSL/Greyscale tab. There make sure the luminance tab is open and then press the left mouse key on the blue of the sky and move the mouse up or down to adjust the color (left screenshot below). In case the blue is not blue or it needs more saturation, you can do the same with the hue or saturation tabs open. Now the photo is light enough with a nice blue sky.

Next go back to the basic tab and look for the clarity, vibrance and saturation options. In the case of this sample photo I needed to set them to +5, +7 and -2 to get a good balance. This totally depends how you want your photo to look like and is also a bit personal. The reason why I put the saturation to -2 is that I saturated the greens and blues separately with the Targeted Adjustment Tool.

The following step depends on the photo if this is needed or not. I prefer my buildings straight if possible so I always try the automatic upright function of Adobe Camera Raw first (see screenshot below; note: I did this actually after the fine tuning). Select the Transform Tool and click on the A in the upright menu. In the case of this sample photo this was enough to straighten the lines of the building. This step marks the end of my basic photo editing workflow. I’ll give you a few short tips on fine tuning too but I will not go in detail in this article.
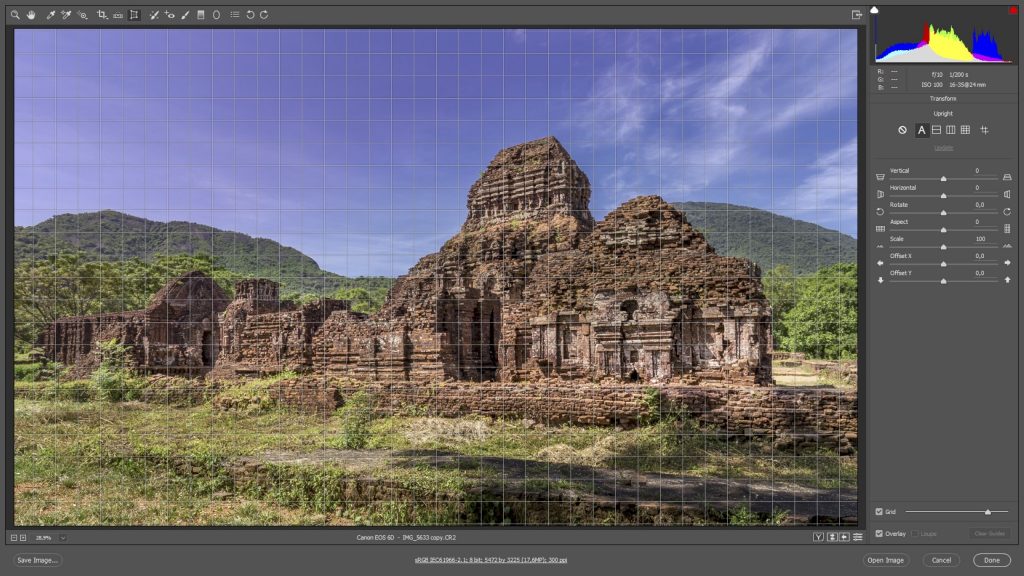
The steps I did to finetune this photo
I’ll summarize what I did to fine tune the photo. In another tutorial I will explain some more features I often use. The first thing I normally do to fine tune is put some radial and graduated filters over the photo. I added several radial filters (make sure to put feather around 50%) on parts of the building. They are all the white markers in the screenshot below. Each one I give a warmer temperature and a more magenta tint as the stones were warm and more magenta than green. I also added some minus and plus exposure on some of them. Just play around with these radial filters to give some nice effect in the light.
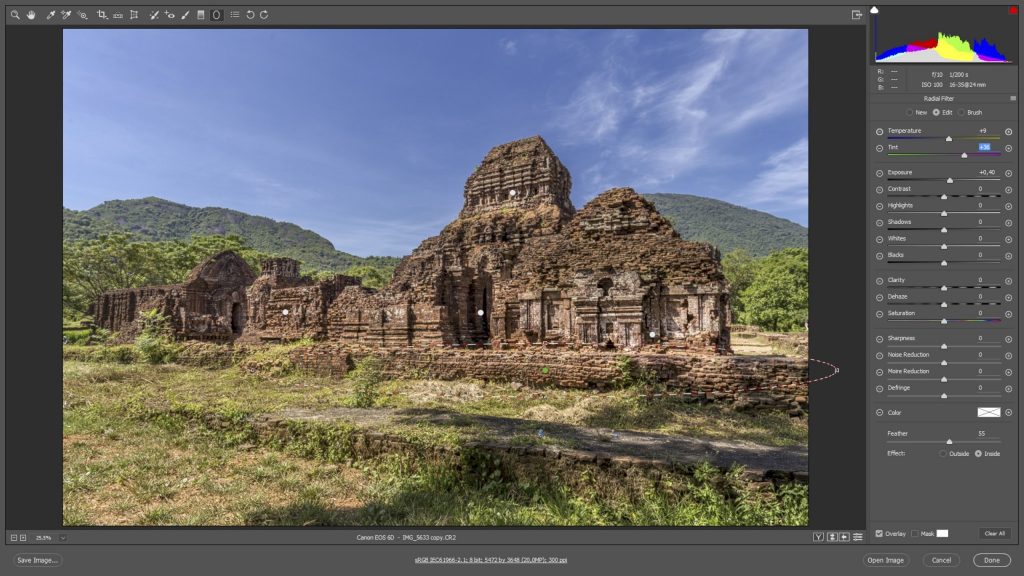
I then added one graduated filter as you can see in the following screenshot. I did a -0.15 on the exposure, a +12 on the temperature and a +53 on the magenta to give the sky a nice warm look. If you look at the above screenshot you see two blue cans on the stones. We don’t want this garbage on the photo so I used the spot removal tool to remove them. This works very easy for small things and doesn’t require Adobe Photoshop.
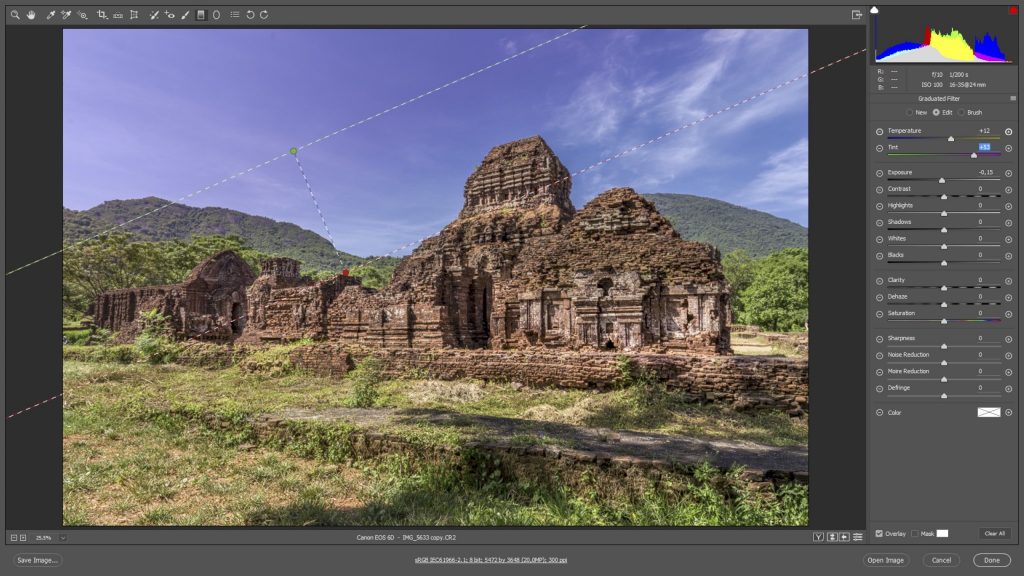
Finally, I played around with the Targeted Adjustment Tool on the greens. I changed a bit the hue and saturation like we did with the blue of the sky before. Actually this was needed because I added some magenta and temperature in the overall photo making the green a bit magenta’ish. In this case press on some green area and move the mouse to adjust while the hue tab is open. I added more radial filters on the mountains in the back to remove a bit the haze. In the right corner, I made the shadows of the tree pop a bit more and I played around with a bit more features until I got the result as in the photo below.
If you liked this tutorial then please let me know in the comments below! If there are enough comments I will be more excited to write a second article with some more fine tuning tricks. The basics however are always the same. Just play around with it and see what the standards are for your camera and I guarantee you that the basic steps won’t take more as 2 minutes!
Stay tuned for more stories and subscribe to the newsletter or follow CTB on social media (Facebook, Twitter, Instagram including Instagram stories; on all social media you can find CTB @christravelblog) to get updated information.
